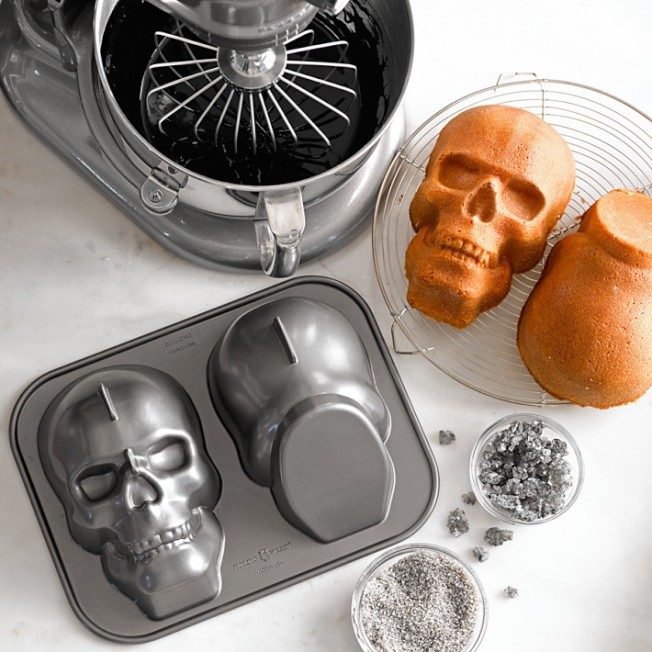
This year, we’ve got the ultimate centerpiece for your Halloween party: a skull cake! Our pan helps you to bake a sweet treat in the shape of a spooky, grinning skull, which is guaranteed to start some conversations among your guests. That’s exactly what it did around here, especially when the cake appeared in our catalog with a huge chef’s knife sticking out the top. How’s that for a serving suggestion?
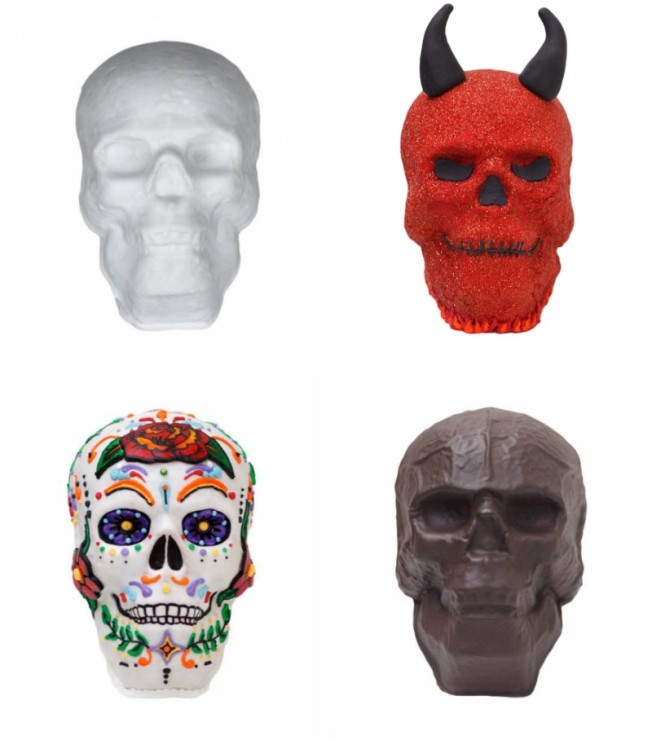
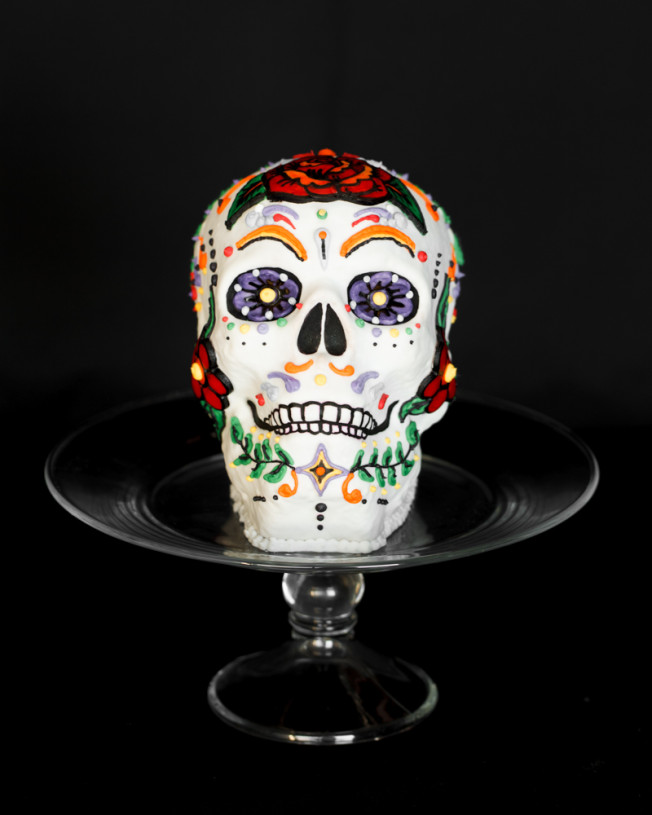
For more creative ways to decorate the cakes, we turned to food stylist Cathie Lopez, who came up with four fun ideas. The first two — white and chocolate skull cakes — are perfect for cake decorating beginners looking for a simple project that’s sure to impress. The other ideas take this cake to the next level of skill and imagination, creating a devilish skull and a clever nod to the Mexican holiday, Dia de los Muertos.
Break out the food coloring, preheat the ovens, and start baking! Your Halloween celebration just became legendary.
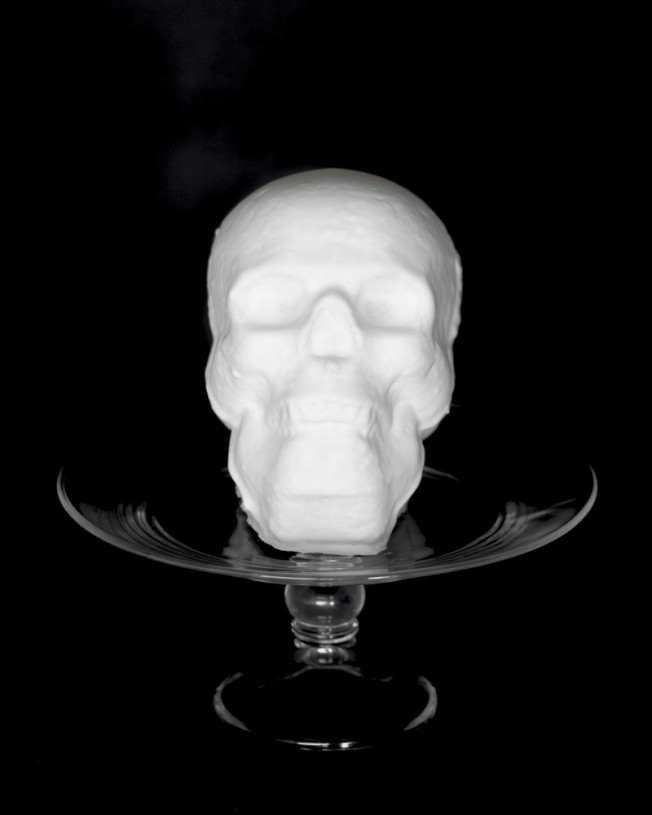
For the cake, follow the baking instructions on the cake pan packaging. Assemble the two cake halves together with frosting and place on a cookie rack for glazing.
White Glaze
8 Tbs. hot water
4 cups confectioners’ sugar
3 Tbs. meringue powder
To make the glaze, combine powdered sugar, hot water and meringue powder and mix until smooth. Add more hot water to get a thin, pourable consistency for glazing (glaze will harden when cool).
To glaze the cake, place the cake on a wire rack and pour the glaze over the top of the skull. As the glaze flows over the cake, use the back of a spoon to get the glaze into the eye sockets, nose and any other hard-to-reach areas.
Once the glaze has hardened, carefully remove the cake from the rack and place it on a cake stand using a small amount of icing to secure it to the base.
For the cake, follow the baking instructions on the cake pan packaging. Assemble the two cake halves together with frosting and place on a cookie rack for glazing.
Chocolate Glaze
2 Tbs. melted butter
8 Tbs. unsweetened cocoa
8 Tbs. hot water
4 cups confectioners’ sugar
2 tsp. vanilla
1 Tbs. meringue powder
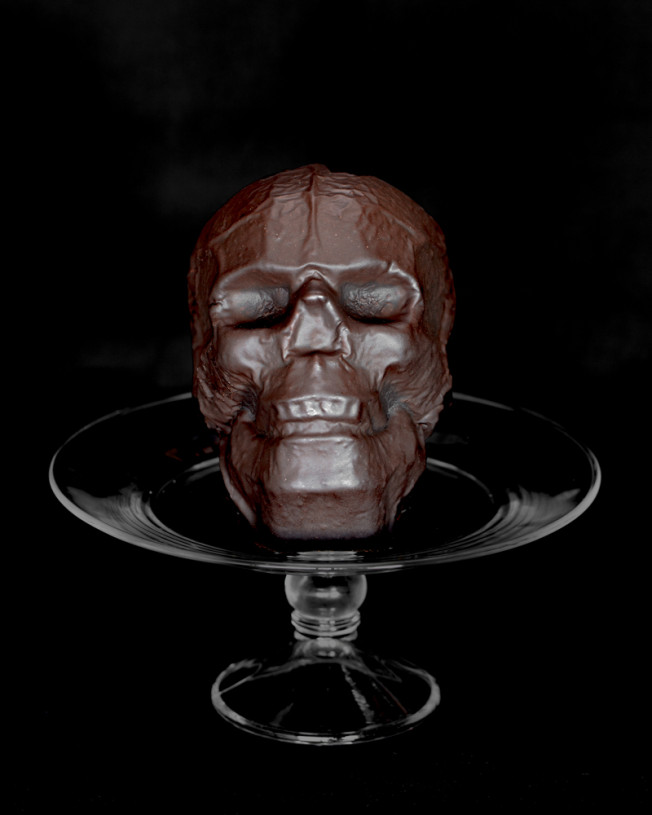
To make the glaze, combine melted butter, cocoa and hot water. Blend in confectioners’ sugar and vanilla and mix until smooth. Add more hot water to get a thin, pourable consistency for glazing (glaze will harden when cool).
Place cake on a wire rack and pour glaze over the top of the skull. As the glaze flows over the cake, use the back of a spoon to get the glaze into the eye sockets, nose and any other hard-to-reach areas.
Once the glaze has hardened, carefully remove the cake from the rack and place it on a cake stand using a small amount of icing to secure it to the base.
For the cake, follow the baking instructions on the cake pan packaging, except reduce flour by 1/4 cup, and add 1/4 cup unsweetened cocoa powder and 1 oz. liquid red food coloring. Assemble the two cake halves together with frosting and place on a cookie rack for glazing.
Red Glaze
8 Tbs. hot water
4 cups powdered sugar
3 Tbs. meringue powder
Red food gel
To make the glaze, combine powdered sugar, hot water, meringue powder and red food gel until smooth. Add more hot water to get a thin, pourable consistency for glazing (glaze will harden when cool).
Place cake on a wire rack and pour glaze over the top of the skull. As the glaze flows over the cake, use the back of a spoon to get the glaze into the eye sockets, nose and any other hard-to-reach areas.
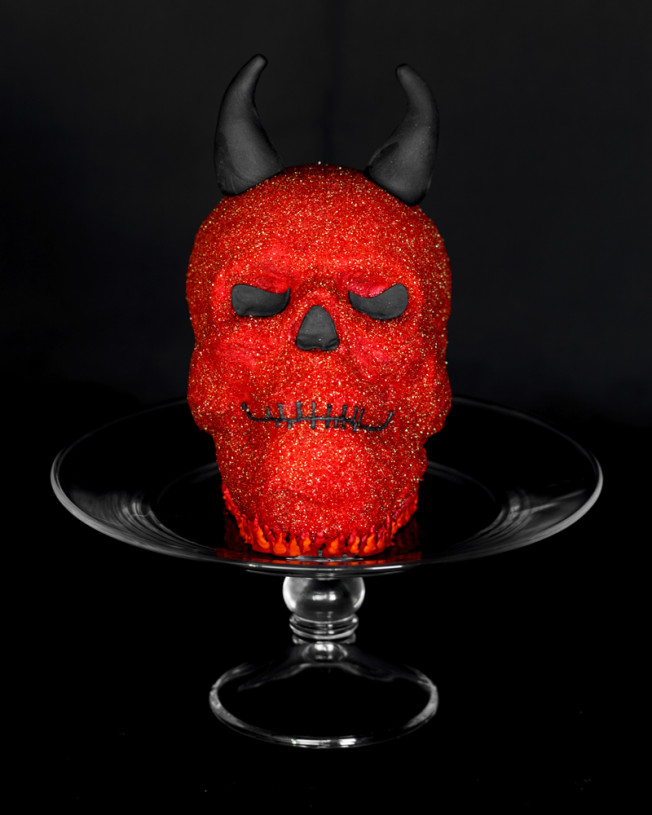
Once the glaze is poured over the cake, sprinkle red sanding sugar over the glaze. When the glaze has hardened, gently brush off any extra sanding sugar. Remove the cake from the rack and place it on a cake stand using a small amount of icing to secure it to the base.
Make royal black icing (see above recipe, substituting black gel for red, and add more powdered sugar to make a thick consistency). Pipe on mouth features. Tint a piece of fondant with black food gel and mold two horns. Attach to the skull using toothpicks. Flatted out another piece of black fondant and cut out the eyes and nose. Attach using a bit of icing and press into place.
For the cake, follow the baking instructions on the cake pan packaging. Assemble the two cake halves together with frosting and place on a cookie rack for glazing.
White Glaze
8 Tbs. hot water
4 cups confectioners’ sugar
3 Tbs. meringue
Blend together the powdered sugar, hot water and meringue powder and mix until smooth. Add more hot water to get a thin, pourable consistency for glazing (glaze will harden when cool).
To glaze the cake, place the cake on a wire rack and pour glaze over the top of the skull. As the glaze flows over the cake, use the back of a spoon to get the glaze into the eye sockets, nose and any other hard-to-reach areas.
Once the glaze has hardened, carefully remove the cake from the rack and place it on a cake stand using a small amount of icing to secure it to the base.
To decorate the cake, first roll out and flatten a piece of white fondant. Cut out a rose, leaves and flower shapes. Attach these to the skull using a bit of water or frosting. These pieces can now be hand painted with food gels and decorated with piped icing.
To paint with food gels, you will need a clean fine artist brush, food gels and alcohol. The alcohol allows the food gels to dry. Put a small mount of food gel onto a plate. Dip the brush into the alcohol and mix into the food gel. Paint directly on the fondant and the dried glaze.
Color royal icing in various colors (see recipe above and add more powdered sugar to make a thick consistency). Pipe directly onto the fondant and dried glaze to create a variety of designs.
Get the Skull Cake Pan

54 comments
Hi everybody 🙂 I’m relatively new to 3d printing and I have many questions on the subject, so I hope you won’t get mad at me for asking here at least couple of them. I think even before I’ll get seriously into designing I should focus on the software itself, and that’s what I’d like to ask you about. Mainly, should I look for the most simple/crudest program I can find or would it be better to look for something more complicated? I’m worried that I’ll get some unwanted habits while working with less complex software. Right now I’m trying out some online software called SelfCAD (I didn’t have to download anything). I’ve read some good opinions about it, but maybe you could share yours as well? The second question is about the software as well: should I search for program that would let me design and slice it in it, or should I use a different program for each of them? The one I’m suing allows me to do both i it. Does it even make a difference? Surprisingly, I couldn’t find the answer to that, as it seems like most blogs want to focus on the very basics (like what is 3d printing and so on), and while the answers to those questions are fine, it seems like no one wants to go into the details (it looks like some of them even steal from each other! I swear I’ve found the same answers to the same questions on at least 3 different articles) but I’m getting off-topic… The last question is about 3d pens. Would it be possible to somehow convert whatever I draw with a 3d pen to a 3d model in a program? For example, if I’ll draw a horse with 3d pen, would it be possible to get its design in a program? I’m not sure how that could even work, but the very idea sounds interesting to me. Anyway, I think I’ll stop here just in case no one will answer me and all of this writing will go to waste. I’m sorry that I’m using your content to ask questions, but I hope you can relate and advice a beginner like me. Anyway, thank you for posting. I learned something from this and that’s always appreciated. Thank you, and I hope to hear back from you very soon 🙂
[…] mini skull cake pans to genius use with these creepy little numbers that would be just as ideal on Día de los Muertos. She used simple boxed red velvet cake (though you could easily whip up a batch of your own) and an […]
How far ahead can you put the icing on? Could I do it one day ahead? Does it need refrigeration?
Could you please post a picture of the back and side of the day of the dead skull if you have it?
What is the glaze recipe for the cake ?
Scroll up on this page, under each cake is the glaze info.
I am still waiting can you belive this so frustiration I had to make my own recipe for my kids b day the cake did not turn out well please tell me the recipe now that we are close to that seson
Grow up and stop posting temper tantrums. If you asked like a decent adult instead of acting like a brat, maybe others would be more inclined to answer. Loose the all caps typing and Princess entitled attitude.
do you not check this please tell me!
Probably your previous posts demeanor caused others to ignore you.
I’m mad tell me!!!1!
Grow up and stop posting temper tantrums. If you asked like a decent adult instead of acting like a brat, maybe others would be more inclined to answer. You can choose to be mad and stamp your feet and whine over something silly OR you can act like an adult. Pathetic behavior SMH, bet you’re a gem IRL.
WHERE CAN YOU FIND A RECIPE FOR THE GHOST CAKE!!!!!!!!!!!
Try asking nicely. Loose the all caps typing and Princess entitled attitude.
I just used a box cake. I always add a small box of pudding and replace water with milk. Making 12 of the skull cakes-top half only. This cake pan is incredible- nothing sticks, and it washes beautifully
I have 2 q’s:
1. Has anyone tried this with angel food cake?
2. Has anyone tried filling sculls with frosting rather than icing the outsides? i’m afraid icing outside will obscure too much detail and they’ll look like oval blobs.
Hi, I just tried this out with the chocolate version of the cake. I didn’t add the extra chocolate though. Just the cocoa powder. The cake came out really rich. Had a little problem putting it together initially. It was really heavy. So I put the face half back in, put on the icing and the other half and let it set overnight. After that it was pretty easy to handle. It did take quite abit of coaxing to get out of the pan though.
Anyways, I wanted to share my finished product! Happy Early Halloween everyone!
http://thecookiewitch.com/the-skull-has-arrived/
Hi, I just tried it with the recommended recipe in the earlier post. Idon’t think it will work with Angel Food cake. The cake needs to be quite solid to hold it’s shape. I used a buttercream icing on the outside instead of icing. Not the easiest thing although it was the first time I used buttercream icing to decorate a cake . I needed to use a toothpick to draw out the teeth in the end. I kinda feel the icing will work better but i haven’t tried it so I can’t really say. Hope this helps.
[…] How to Decorate Skull Cakes […]
This is wonderful. You should see this where to buy animal skulls too.
Can you use boxed cake mix to make the cakes?
[…] How to Decorate Skull Cakes | Williams-Sonoma Taste – Oct 15, 2014 · This year, we’ve got the ultimate centerpiece for your Halloween party: a skull cake! Our pan helps you to bake a sweet treat in the shape of a spooky …… […]
[…] Find more skull decorating inspiration here. […]
Thank you! And thank you Cathie for her advice. I hope to post a picture this week of my finished product.
Hi! Would you recommend using the buttercream frosting to seal the two halves together? Or is that for frosting the cake? Would store bought frosting work to seal the two halves together and place on a dish to hold it? One more question, once the two halves are sealed together with frosting, it says to place cake on a wire rack to do the glazing. How does the cake stand upright on a wire rack? Should you frost the wire rack as well to hold the base of the skull in place? Would you recommend glazing while the cake is comprised on two separate halves (each half can lay on a cookie rack flat side down) and then put together? I am making this cake this week for the first time for a friend’s birthday this week and want to make sure it goes smoothly!1
Hi Simona, we passed your question along to Cathie, and here’s what she had to say:
You can use the buttercream frosting to glue the two halves together. Store-bought frosting will work, but add powdered sugar to it to make it thicker. Once you put the two halves together, let the cake set for 30 minutes before glazing. Once it sets, you’ll be surprised how easy it is to handle and will sit upright on a rack for the glaze without any additional frosting on the rack. Let the glaze set up before removing from the rack. Use a large spatula to release the cake from the rack and gently place your hand on the top of the skull. Then you can easily move the cake to a cake platter. For added security, put a couple of wooden skewers through the two halves of the cake before glazing to insure that they will stay together. Just remove them as you are cutting the cake to serve.
I wouldn’t recommend glazing the two halves first. It’s very difficult to put the two halves together without wrecking the glaze.
Good luck!
I have an absolutely brilliant idea for decorating the cake but whether it’s going to be a success or flop depends on the overall cake dimensions.
That being said, I was wondering if you could tell me what the cakes dimensions were (_”L x _”W x _”H) once both halves were put together?
Hi Heather, the dimensions are 7”L x 5”W x 7”H. Enjoy!
Do you have a cake box that would safely fit/ cradle a skull cake for transporting?
Sorry, but we don’t at this time!
Hi. I’d like to make a chocolate skull cake. Does anyone know how to modify the recipe that comes with it? Thanks! Nancy
Hi Nancy, we haven’t tested the recipe this way, so we can’t guarantee it will be perfect, but here’s what our Test Kitchen cooks recommend:
-Instead of greasing & flouring pan, try greasing & dusting with cocoa powder
-Add 1 cup cocoa powder to dry mix
-Reduce flour to 2 3/4 cups
-Add 6 oz. melted, cooled bittersweet chocolate along with the vanilla
-Use chocolate buttercream instead of vanilla buttercream:
https://www.williams-sonoma.com/recipe/quick-chocolate-buttercream-frosting.html
Also, the baking time might need to be adjusted slightly.
Good luck and please let us know how it goes!
Thank you so much. I’m making a test cake tonight before this weekend’s six year old spooky birthday bash. I will let you know.
Nancy
Love this cake pan, nice not having to carve this time…this is how mine came out:
https://www.facebook.com/photo.php?fbid=680252665333380&set=a.515316665160315.120506.239759769382674&type=1&theater
I trimmed my cakes per the direction, but the cake didn’t rise clear to the top. Therefore when you put the two halves together, there is a huge gap. In this case, should I trim where there is a visible line? Seems like a lot of wastage. I used the recipe provided on the packaging.
I ended up throwing the sugar at the cake and all over my kitchen…the result was an AMAZING cake and lots of crazy the-dyed paper towels following clean up duty. Toward the end of the decorating I found that I could gently press the sugar into the glaze without any negative effects.
I used the cake recipe from the tin, the chocolate glaze recipe above, and the black sanding sugar. Awesome results.
I should add that I tried my own red velvet cake recipe and it fell apart. Need to use a very sturdy cake batter.
The sugar sticks to the glaze, that’s no problem, but there’s a slope at the back of the skull (and a couple other places) the sugar won’t hit if you pour it on from above. You almost need to fling it sideways, which doesn’t seem optimal. Any suggestions? Thanks.
I used a wide frosting knife, held it horizontally with a bit of an angle. As I moved up and down, I poured the sugar on the blade and let the sugar ricochet off the knife. That seemed to work well. I then used the blade to pat down the sugar. I used the recipe supplied on the packaging (and on this site, thanks!)-worked very well.
I could not get hold of black sugar. Is it okay to use black sprinkles instead ? I am baking the cake for someone who does not like chocolate. Any other suggestions for glaze to use with black sprinklers?
Hi Marylou, yes, you can try decorating with sprinkles, though they’ll be a bit harder to make stick since they are larger and sturdier than the sugar. As for the glaze, you can try the white glaze described above (as shown in the first skull cake image). If you like the darker color, you can simply color it with black food gel instead of using chocolate.
Thanks so much ! One more question if you don’t mind….what is the difference between using your buttercream recipe and the glaze when pouring the sugar and my black sprinklers?
A buttercream frosting will be much softer than a glaze, and it won’t harden in the same way. We’d recommend using the glaze recipe here or finding a similar one. Good luck!
[…] Full Instructions can be found here. […]
My husband threw the packaging away on accident…is there any way to get a copy of the cake recipe? Thank you!
Hi Amy, here’s the recipe — hope you enjoy!
Skull Cake
For the cake:
3 1/2 cups (545g) all-purpose flour
2 tsp. baking powder
1 tsp. salt
20 Tbs. (2 1/2 sticks/315g) unsalted butter
2 cups (500g) granulated sugar
5 eggs, lightly beaten
1 1/2 tsp. vanilla extract
1 1/3 cups (340ml) milk
For the buttercream:
2 Tbs. unsalted butter
3/4 cup (90g) confectioners’ sugar, sifted
1 1/2 tsp. milk
1/4 tsp. vanilla extract
Pinch of salt
Have all the ingredients at room temperature.
Position a rack in the lower third of an oven and preheat to 325°F (165°C). Grease and flour both wells of the skull cake pan; tap out excess flour. Place the pan on a parchment-lined baking sheet.
To make the cake, in a bowl, whisk together the flour, baking powder and salt; set aside.
In the bowl of an electric mixer fitted with the flat beater, beat the butter on medium speed until creamy and smooth, about 30 seconds. Add the granulated sugar and continue beating until light and fluffy, about 5 minutes, stopping the mixer occasionally to scrape down the sides of the bowl. Add the eggs a little at a time, beating well after each addition. Beat in the vanilla just until incorporated, about 1 minute.
Reduce the speed to low and add the flour mixture in 3 additions, alternating with the milk and beginning and ending with the flour. Beat each addition just until incorporated, stopping the mixer occasionally to scrape down the sides of the bowl.
Spoon the batter into the prepared wells, dividing evenly. Tap the pan gently on a work surface to release any air bubbles. Bake until the cake begins to pull away from the sides of the pan and a toothpick inserted into the center comes out clean, 65 to 70 minutes. Transfer the pan to a wire rack and let the cake cool upright in the pan for 15 minutes.
Meanwhile, make the buttercream: In the bowl of an electric mixer fitted with the flat beater, beat the butter on medium speed until smooth and creamy, about 1 minute. Add the confectioners’ sugar, milk, vanilla and salt and beat until light and fluffy, about 1 minute more, stopping the mixer to scrape down the bottom and sides of the bowl as needed.
Tap the pan gently on a work surface to loosen the cake. Invert the pan onto the rack and lift off the pan. Let the cake cool completely, at least 2 hours, before assembling.
Return both halves of the cooled cake to the pan. (This is easily done by placing the pan over the cake halves and inverting the rack onto the pan.) Level the cake by using a serrated knife to gently saw off the part of each cake half that rose above the edge of the pan. Then remove one half of the skull cake from the pan.
Spread a thin layer of buttercream, about 1/3 cup (80ml), over the cut side of the cake half that is still in the pan. Place the other half on top of the buttercream and press down gently to secure the 2 halves. For added stability, insert a 4-inch (10cm) skewer into the base of the skull and another skewer into the upper half of the skull from the back side of the cake. Cover loosely with plastic wrap and refrigerate the cake until the buttercream is firm, about 30 minutes.
In the center of a serving plate, place a mound of buttercream (about 1 1/2 Tbs.) half the size of the cake’s base. Remove the cake from the pan by lifting the pan vertically and tilting it forward, then catching the cake with your hand. Place the cake upright on the plate, on top of the buttercream. Decorate as desired. Serves 16.
Thank you so much!!! I really appreciate your help.
-Amy
I love this skull l;ocake it really brings out my inner head and my beauftil killer
After seeing the dramatic skull cake in the catalog and displayed in the same fashion at the store, I bought the skull pan and black colored sugar. I want to make it with the black glitter just like in the catalog, but there are no directions on the William Sonoma website about how to make the colored sugar stick to the cake. Please let me know where I can find that information. Thanks.
Hi Devorah, to make the glitter stick, it’s a good idea to first glaze the cake; the sticky glaze will cause the sanding sugar to adhere. Use the instructions for the Chocolate Glaze above, and while the glaze is still tacky, sprinkle black sanding sugar over the glaze. When the glaze has hardened, gently brush off any extra sanding sugar.
Love the cake pan skulls
nobody cares
“Tub”…?
Is that because you’re a fat tub? Of lard?
I love all the cakes I have to get the skull cake pan.
i buy it email me your address muhaha
ha