This post comes courtesy of Elaine Smit of Chow Bella Kids.
Another school year is coming up, but there are still weeks until summer is over. You may not be thinking about what you are going to make for your child’s lunch, but I find myself actually looking forward to making my daughter’s school lunches this fall.
Believe me, this hasn’t always been the case. In years past, I used to simply buy a hot lunch for her or give her money to buy her own lunch.
So what changed? I discovered the Japanese bento box concept. I love everything about the bento box. Bento embraces all that is healthy, green, fun and creative. All it takes is a little planning and some lunch items thoughtfully placed in your box and you are on your way.
In Japan the bento box comes in many sizes and shapes with various compartments in which to place your lunch items. The Japanese bento lunch box uses ingredients that are almost always fresh, and may include portions of rice, vegetables and fruit, strategically placed in a decorative arrangement to suggest the food is appealing and fun.
The idea is to use all the space in the box by filling in the empty areas with small food items such as cherry tomatoes, grapes or baby bell peppers. We think the best thing about the bento box is that it encourages creative fun with food while offering a variety of healthy choices, so it can satisfy even the pickiest eater.
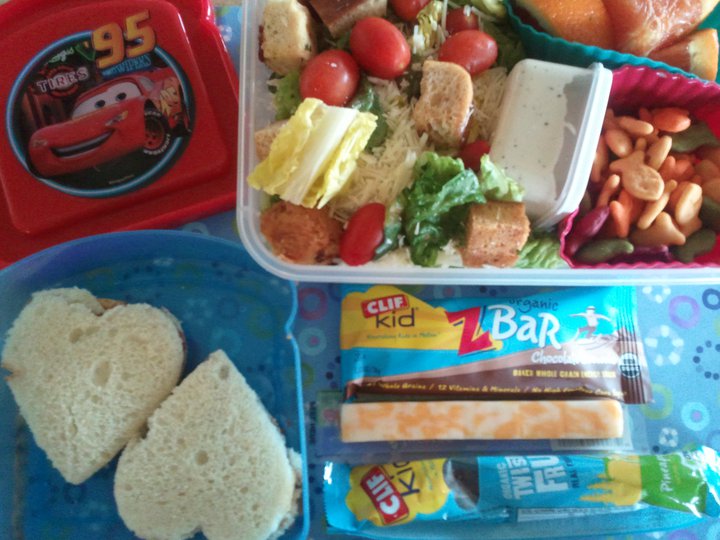
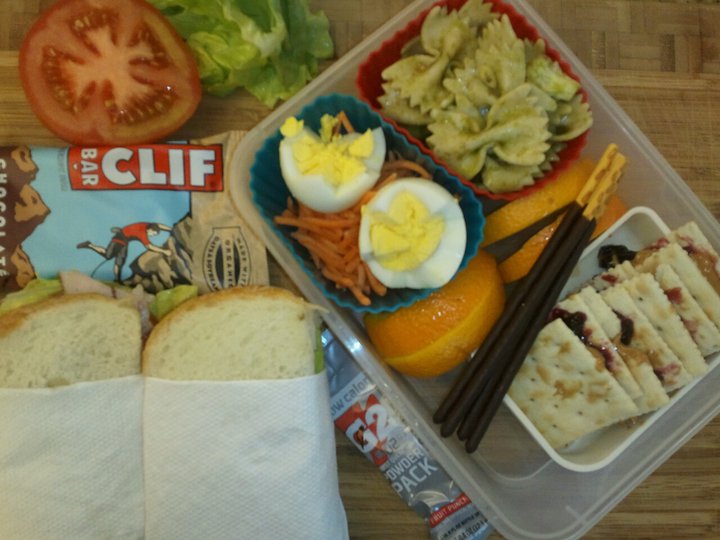
Although Jenny and I love the Japanese bento concept, we realized that a few adjustments needed to be made to accommodate her American palate and high school backpack, so we created our version of the American bento box.
First, we substitute the traditional Japanese bento lunch box with our American version: a plastic rectangular-shaped container made by Rubbermaid (fits easily into her backpack), with silicone baking cups for food separators. Next, we gather our assortment of gadgets we keep on hand especially for making our bento box, such as mini cookie cutters for creating fun fruit shapes, small containers to hold soy sauce or salad dressing, and a paring knife to carve funny faces into our vegetables.
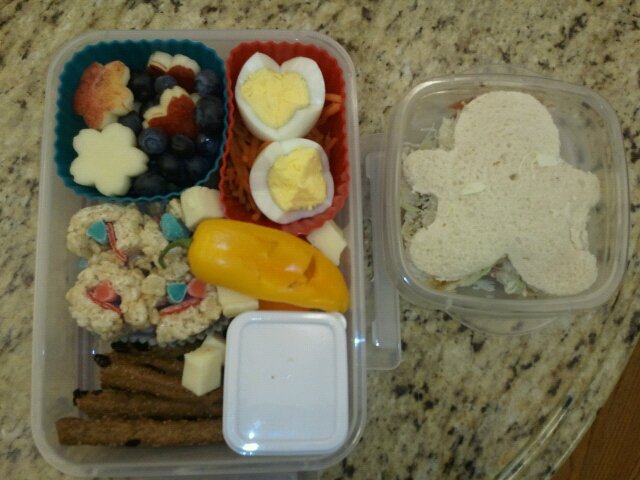
Here a some of the healthy lunch items that go inside Jenny’s American bento box:
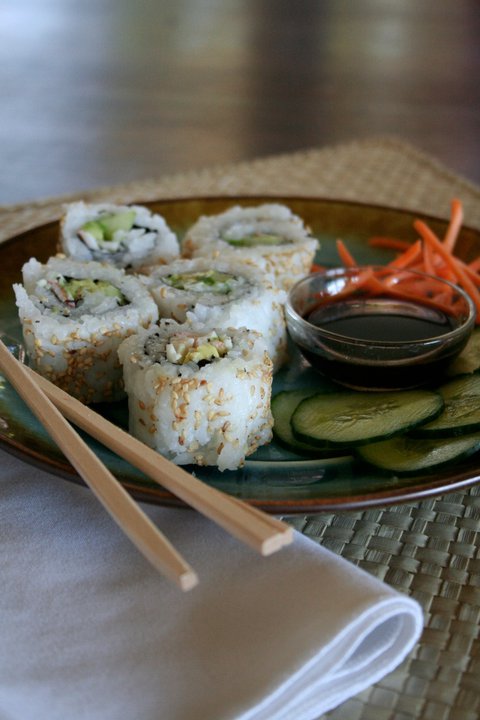
• California rolls with soy sauce
• Garden salad with ranch dressing
• Mini bell peppers with smiley faces carved into them
• Hard-boiled egg in the shape of a heart or smiley face (we use special molds found in Asian markets)
• Sandwich (PB&J, turkey, etc.) cut with a cookie cutter into a circle or a heart shape
• Apples, peaches, bananas or other fruit, sliced and cut into flower shapes with mini cookie cutters.
• Pocky, a Japanese cracker dipped in chocolate
• Z-Bar, Chewy bar, granola bar, etc.
You can personalize your bento box with anything your kid loves to eat, such as crackers, string cheese, pasta, nuts and raisins. We keep the theme green by using reusable containers, forks, spoons and drinking bottles.
Here’s a recipe for Jenny’s favorite bento box item, California Rolls.
California Rolls
If the typical California roll ingredients don’t appeal to your tastes, try some of these instead: shredded carrots, chicken, sliced bell pepper or your favorite vegetables.
 Equipment needed: bamboo sushi mat and rice cooker (helpful)
1 sheet nori seaweed
1 cup prepared sushi rice (recipe follows)
1 Tbs. sesame seeds, toasted
2 oz. crabmeat, shredded
1/2 avocado, peeled, seeded and cut into fine strips
1/2 cucumber, peeled, seeded and cut into fine strips
Wasabi, soy sauce and/or pickled ginger for serving
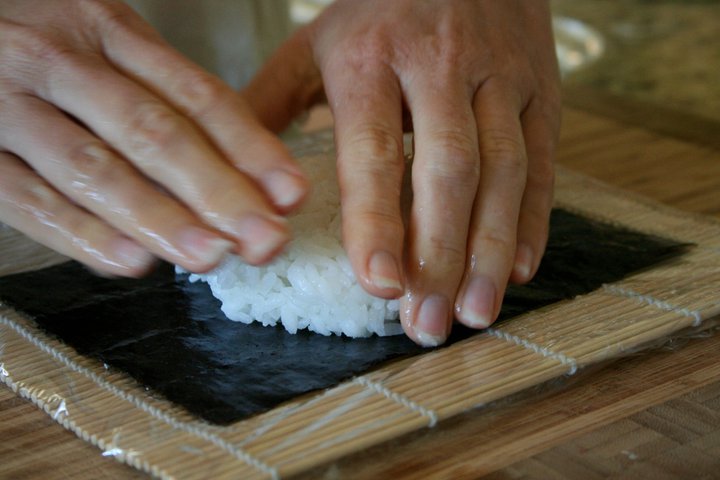
Cut the nori sheet in half and place it, shiny side down, on a bamboo mat. Dampen your fingers in water. Scoop a baseball-size amount of sushi rice in your hands and spread a thin layer of rice over the seaweed; do not cover completely. Sprinkle with half of the sesame seeds.
Carefully flip the nori so the rice is now facing the mat. Lay a small amount crabmeat, avocado and cucumber lengthwise. To roll, slowly fold the end of the mat closest to you over the filling and tuck it in. Use medium pressure to create a compact tube. Remove the mat from around the roll, press in the loose ends and set, seam side down, on a cutting board. Repeat with the remaining ingredients.
Have an adult do this: Dampen a sharp knife and cut a roll in half. Place the 2 halves side by side and make 2 more cuts, forming 6 pieces. Repeat with the remaining roll. Serve with wasabi, soy sauce and/or pickled ginger. Makes two 6-piece California rolls.
Master Sushi Rice
2 cups sushi rice
1/2 cup rice wine vinegar
1/4 cup sugar
Wash the rice until the water runs clear. Place the rice in a rice cooker. Fill the cooker with water to cover the rice by about 1 inch, or use the Mount Fuji method (described below). Cook the rice according to the manufacturer’s instructions. Transfer the rice to a large glass or other non-metal dish.
In a small saucepan, slowly heat the vinegar and sugar on the stovetop until very hot but not boiling. Fold the vinegar and sugar into the hot rice, adding enough so the rice has a tart/sweet taste. The rice should be shiny, not mushy. Carefully clean the inside rim of the bowl with a damp cloth, cover and let rest until the rice is cool, about 30 minutes. Makes 4 cups.
Note: The Mount Fuji method is a way to determine the correct amount of water for any quantity of rice. First wash the rice until the water runs clear to wash away all the starch. Then put it in the pan, put your hand flat on top of the rice, and fill the pot with water until it reaches the first knuckle of your index finger (the knuckle nearest your palm). It always works, no matter what the size of your hand.
Tip: Cover the bamboo sushi mats with plastic wrap to prevent the rice from sticking and for easy cleanup. Also, keep a small bowl of water nearby to dip your hands into while you are spreading the sushi rice. This prevents the rice from sticking to your fingers and helps to spread the rice.
About the author: Elaine and her daughter Jenny are the founders of Chow Bella Kids. A business that specializes in cooking events just for kids. They teach kids cooking classes, cooking parties, summer camps, scouts and private cooking events. They created www.chowbellakids.net/ blog where they showcase kid friendly recipes, cooking tips, and videos. They are committed to educating and inspiring kids. They strive to make a bigger difference on the planet through the power of teaching children and families kids how to cook in a safe, fun and healthy environment.