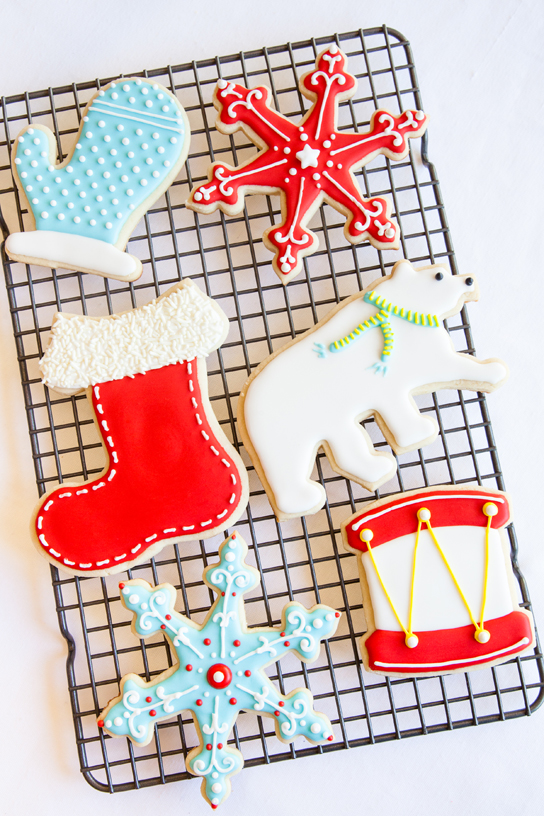
Beautifully-decorated Christmas cookies make a wonderful and impressive gift that are almost too gorgeous to eat. These works of edible art can be mastered at home easily; all it takes is the right tools and a little bit of practice. We talked to food stylist Cathie Lopez about her tips, tricks and recipes for making foolproof, exquisite cookies every time.
STEP 1: Bake your cookies!
Pick your favorite sugar cookie recipe and select your favorite cutters. Cathie swears by the recipe below, developed over years of trial and error with various sugar cookie recipes. “My sons and their friends were the lucky recipients of all my rejects,” says Cathie.
Cookie Dough
- 1 cup unsalted butter, room temperature
- 1 cup sugar
- 1 large egg
- 1 tsp. vanilla extract
- 2 tsp. baking powder
- 3 cups all-purpose flour
Preheat oven to 400ºF.
Cream butter and sugar together. Mix in egg and vanilla, and then add baking powder. Add flour one cup at a time until dough is very stiff. Chill for approximately 20 minutes. Roll out on a floured surface to 1/4- 3/8” thickness. Cut out shapes and bake for 6-7 minutes. Baked cookies will look white and under cooked and should only be very, very slightly browned on the edges. Cool cookies on a rack completely before icing. Makes approx. 24 small, 18 medium & 12 large cookies.
STEP 2: Make your icing
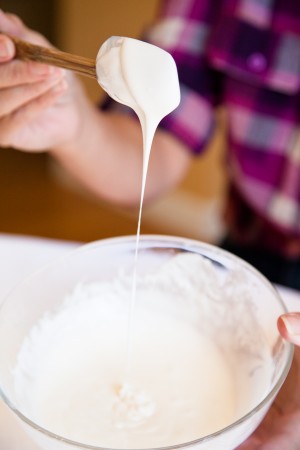
“The consistency of the icing is key to decorating cookies successfully. It should have a texture that’s not too thin or thick–when it falls flat in ribbons back onto itself, that’s when you’ll get the best results,” says Cathie. She makes a big batch of white, and then smaller batches of colors. “I buy gel food coloring from craft supply stores. You get much more intense colors from them.”
Royal Icing
In the bowl of an electric mixer fitted with the whisk attachment, beat the egg whites, confectioners’ sugar, cream of tartar and salt on medium-low speed until blended.
Add the vanilla or lemon juice, increase the speed to medium-high, and continue beating until stiff peaks form and the mixture is nearly triple in volume, 7 to 8 minutes.
Remove the bowl from the mixer, cover tightly with plastic wrap and store at room temperature until ready to use, up to 6 hours.
STEP 3: Ice
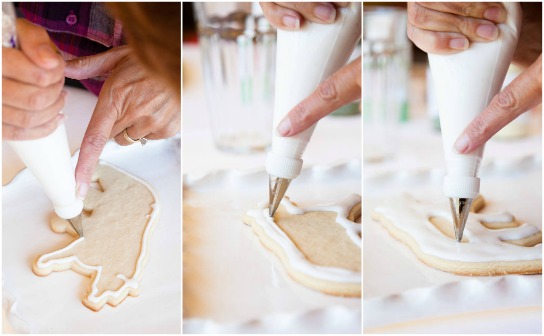
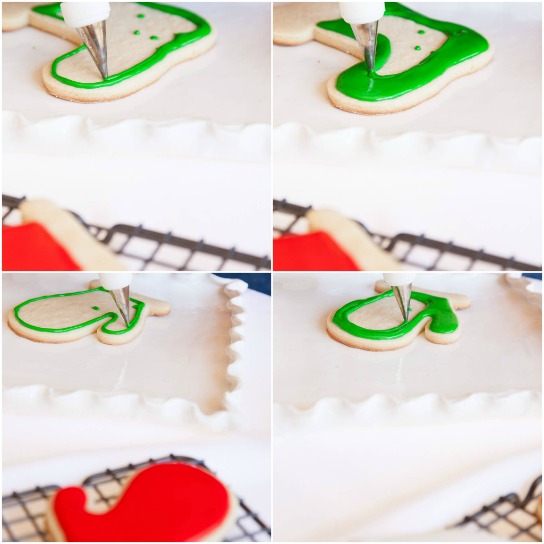
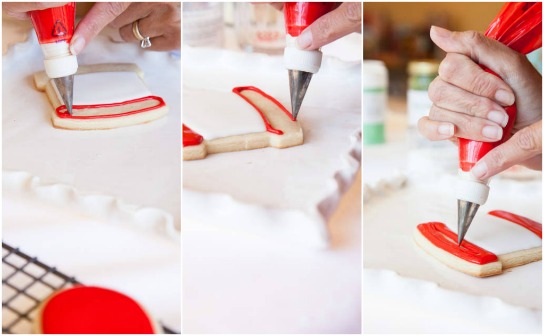
Cathie uses a pastry bag fitted with a number 3 tip do the initial icing that covers the entire surface of the cookie, which she calls “flooding.” Starting with the perimeter, she pipes in the icing at the outer edge of the cookie, and then works her way back around the perimeter, filling in the cookie with icing as she goes. Use your finger to guide the pastry bag in a straight line.
When icing a cookie that has two different, contrast colors, Cathie recommends icing in white first, and then letting it dry up to 24 hours until it is completely dry to the touch, so the colors won’t run.
If your icing seems too thick, you can add water to the batch to thin it out. Alternately, add powdered sugar to thicken your icing.
STEP 4: Decorate
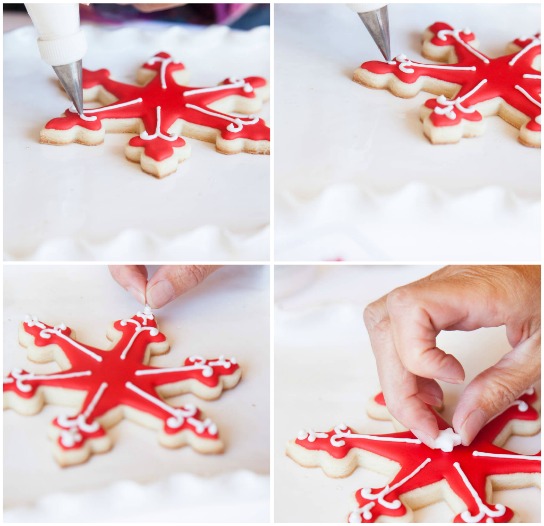
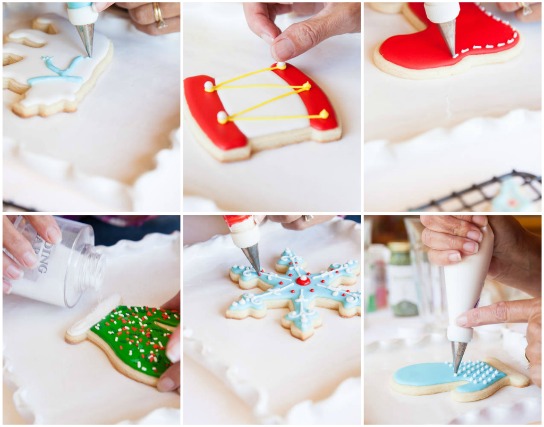
If you plan to decorate your cookies with beads, sprinkles, or sugars, it’s okay if they are still a little bit wet—this will help the decorations adhere to the cookie. If you are going to use additional icing layers as decorative elements, let your cookies dry completely before adding the other layers; Cathie lets hers dry for up to 24 hours.
When using icing for decoration, it should be thicker than the icing you used to flood your cookies. Add powdered sugar until the icing is your desired consistency. Cathie uses a #2 tip for decorating.
STEP 5: Gift
Wrapped in cellophane, tied in ribbon, packed and wrapped in boxes: See our tips for creating beautiful wrappings for homemade gifts.
 Special thanks to Cathie Lopez for letting us watch her amazing decorating skills in action. We can’t wait to start making our own Christmas cookies!
Photos by Alison Christiana.


57 comments
Thanks for the update and quick reply. I’ll be sure to keep an eye on this thread. Looking for the same issue. Bumped into your thread. Thanks for creating it. Looking forward for solution.
[…] fun part! Roll out your sugar cookie dough on a well floured surface. I typically like to use the William and Sonoma cookie recipe. Then place your parchment paper or cardstock template on top of the dough, and use a knife to […]
[…] Royal Icing: recipe minimally adapted from https://blog.williams-sonoma.com/cookie-decorating-how-tos/ […]
I’m short on time this year (who isn’t!) and plan to make my cookies with a slightly different recipe today, if I want to decorate Friday morning (three days from now) for guests who will be receiving them late that night what’s the best way to store the baked but undecorated cookies for the 3 days in between? Thank you!!!
I am looking for the easiest way for 11 year old girls to decorate cookies. Using a bag with a tip or I see that pens are now available to fill with chocolate.. can they also be filled with colored icing? Does anyone know if the bags or pens are easier to handle for smaller hands?
[…] (Williams-Sonoma) […]
i live in kolkata, india, even though i cook the cookie a little extra, the overnight setting of the icing makes it soft, the climate is very humid here. please suggest.
[…] (Williams-Sonoma) […]
[…] (Williams-Sonoma) […]
[…] (Williams-Sonoma) […]
So is it 5 cups of sifted powdered sugar? or is it 2 1/2 cups sifted powdered sugar. Because it says 2 2 1/2 cups. but it only tells you to add sugar one time.
I think what that means is 2 to 2 1/2 cups of powdered sugar, meaning that you will add anywhere from 2 cups to 2 1/2 cups of powdered sugar to your recipe in order to get the proper consistency for your icing. I don’t think it means to add 2 separate 2 1/2 cup portions of powdered sugar (to make 5 cups of powdered sugar). I think that the recipe authors probably allowed a 1/2 cup of ‘wiggle room’ in the recipe because of the moisture content differences that exist between different bags/brands of powdered sugar, different climates, different countries etc. Hope that helps! (and hopefully Williams Sonoma is still responding to this post in order to verify that I’m correct… But I’m pretty sure what I said was accurate) 🙂 good luck!
Can I do the icing a day before decorating?
This is wonderful recipe! Cookies are soft, super tasty and royal icing is just perfect!
Awesome cookies. Looking forward to making some to share with others! Thank you for your inspirational updates!
Thanks
Curious if you ever make your own cutters besides using the ones from Williams-Sonoma or other brands? If so, can you share a how to? I’ve been wanting to do this for quite a bit now. Thanks in advance.
The dough was EXTREMELY difficult to roll out. Way too dry. Anyone else have the same problem? Could only get about 15 cookies for the whole batch…
[…] season is cookie season! We are all about cookies this month: baking, decorating, gifting and hosting the classic cookie exchange. Today, we’re kicking off 30 days of holiday […]
Thanks for the great recipe – I’m in Australia and making these as gifts for Kindergarten. We’re on metric measurements. Please could you provide the metric measures, especially for the butter. I’ve been given a few different answers from various conversion sites! Many thanks.
Try this website. Good luck!
http://www.weekendbakery.com/cooking-conversions/
[…] season is cookie season! We are all about cookies this month: baking, decorating, gifting and hosting the classic cookie exchange. Today, we’re kicking off 30 days of holiday […]
Hi , your blog really inspired me , ive always been interested in baking but never got round to trying it and after seeing your beautiful images i tried your recipe and tried icing for the first time ever yesterday! One thing id like to know is , as i prefer a crunchy cookie , how to keep the cookies from softening if i have to leave then out overnight for the icing to dry? Do i need to re bake them to bring back the freshness?
Ray xx
Hi Ray, for a crisp cookie, just make sure the cookies are initially baked to the consistency you like them — since ovens vary a little bit, you may want to keep yours in longer than this recipe calls for. Also, make sure the cookies are completely cool before you ice them. If you leave them out overnight, they shouldn’t soften (in fact, they will continue to dry out more over time). Hope this helps, and good luck!
Thanks for the tip about cooking slightly longer, but im from hong kong and the air is quite humid so if left out for too long they would go soft. Another question , do you ever ice on the back of the cookie? i found it easier since its flatter or my rolling skills need improving?!
Ray, to avoid the humidity, place the cookies into an airtight container — we like using tins for keeping cookies crisp.
As for creating smooth cookies, we have two suggestions: 1) When you’re making the dough, at the stage that calls for mixing in the egg, don’t mix it too long — just until combined. If you overdo it, you incorporate too much air and you may get bumps on the surface of your cookies. 2) After rolling out the cookies and cutting out the shapes, place the tray of cut outs into the freezer or refrigerator for 15 minutes until firm. When you touch them, there shouldn’t be a mark. Then bake straight from the freezer or refrigerator. This helps to maintain the shape and prevent bumps.
You could ice the back of the cookie, assuming the front side is not so bumpy that it wouldn’t lay flat. Hope this helps — good luck!
Hello,
Can this cookie be frozen and decorated at a later time
Hi Michael, if you want to freeze the cookies, we would recommend freezing the dough when unbaked. Then you can thaw it out, cut out the cookies, bake and decorate when you’re ready. You can also bake the cookies a day or two before you decorate them; just store the un-decorated cookies in an airtight container at room temperature. Good luck!
[…] Cream butter and sugar together. Mix in egg and vanilla, and then add baking powder. Add flour one cup at a time until dough is very stiff. Chill for approximately 20 minutes. Roll out on a floured surface to 1/4- 3/8” thickness. Cut out shapes and bake for 6-7 minutes. Baked cookies will look white and under cooked and should only Read The Full Story […]
[…] Cookie Decorating How-Tos […]
[…] season is cookie season! We are all about cookies this month: baking, decorating, gifting and hosting the classic cookie exchange. Today, we’re kicking off 30 days of holiday […]
PS – I don’t use recipes with any leavening like baking powder or baking soda. I find the cut out design remains more clear, when the dough has not risen. what do others think?
I bought the gaint snowflake cookie cutters and used them with this sugar cookie recipe. but getting them from the board to the cookie sheet did not go so well. i used a floured wooden board to roll and cut, but the transfer was not good. How do you suggest getting these big cookies to the cookie sheet since they have so many cutouts?
Maybe you could roll out the dough, then put it on parchment paper. Once it is on the parchment, then use the cookie cutter. lift off the dough that is not needed. slide the parchment onto a cookie sheet, and refrigerate for a bit. then cook – still on the parchment. no need to move the cut dough at all. let cool, still on the parchment. I hope this works for you! cheers!
[…] season is cookie season! We are all about cookies this month: baking, decorating, gifting and hosting the classic cookie exchange. Today, we’re kicking off 30 days of holiday […]
WS sells some imprint cookie cutters – the ones where the interior details for the cookie are imprinted on the cookie by the cutter. They are really great looking, but I have lots of difficulty using them. Either there is no imprint – no details – or the dough sticks to the cutter and I can’t get it out unless I destroy the dough. I have tried measuring the depth of the cutter and then rolling the dough to that depth. Any tips for better results? thanks, and happy holidays
Hi Kathy, dipping the cutters in flour helps them release the dough and ensures it imprints properly. Also, our Test Kitchen says you may have to press harder than you think. Good luck!
[…] season is cookie season! We are all about cookies this month: baking, decorating, gifting and hosting the classic cookie exchange. Today, we’re kicking off 30 days of holiday […]
May I ask which brand and which specific colors of gel food coloring were used to create these colors with your royal icing? That ice blue is gorgeous! Perfect festive compliment to the red… Many thanks! 🙂
Hi Marybeth, our stylist I uses Wilton food gels, but the blue color is from our food color set: https://www.williams-sonoma.com/products/baking-decorating-paste-vivid-color/
Those snowflakes are so gorgeous! I’m afraid fail at the patience department when it comes to icing cookies.
Is it alright to put part of this on my webpage if I include a reference to this website?
Props for the entry.
Amateur 18
@ ruthi: Hi, I’ve asked our Test Kitchen if they have an alternate recipe for Royal Icing. They suggested Confectioners’ Sugar Icing, made without the meringue powder. You can find the recipe here:
https://www.williams-sonoma.com/recipe/confectioners-sugar-icing.html?cm_src=RECIPESEARCH
@ashley: Yes, it is fine to make them a week in advance and store them in an airtight container. They generally keep up to two weeks.
@robin: The polar bear cutter was our stylists’ own. We do have these copper cutters, but unfortunately no bear. Sorry about that!
https://www.williams-sonoma.com/products/holiday-copper-cookie-cutters/?pkey=ccookie-cutters-pancake-molds&
Where can I purchase the polar bear cookie cutter? I doesn’t appear on your site.Thanks
I just bought mine from this website:
http://www.kingarthurflour.com/shop/items/polar-bear-cookie-cutter
How long does these cookies last? Can I make them a week in advance?
they look great….my issue is that my family does not like the royal icing…says it’s toooooo hard! any suggestions of an alternative one to use that i could still decorate with? thanks.
This is a GREAT alternative to royal icing. http://www.carrottopmom.com/?p=464 . I have been using it for several years, and it hardens beautifully (but not too hard, just so that it is dry to the touch) and tastes delicious. I always get rave reviews on my sugar cookies… I am making them right now actually. : )
Hi Kelly – thanks for the recipe. I will try your icing. If you put leavening in the cookie, doesn’t it lose definition as it rises in the oven?
I really love to use this recipe (http://oilandblue.blogspot.com/2013/12/how-to-frost-cookies-without-royal-icing.html) – it’s the one my mom has used for years and her cookies are always beautiful. It will dry hard enough to stack and freeze, etc. and is beautifully shiny, too!
It’s handy because it only requires powdered sugar, milk, and flavoring/color.
Happy decorating!
Kelly R –
Google says this website doesn’t exist any more. Do you have a working link to the recipe you use??
Thank you
You can find meringue powder at Walmart or Hobby for around $3-$4 and it comes with a recipe for royal icing. Look for it in the cake decorating section. Happy cookie baking!
hello, where can I buy merenguis powder
Thanks
BEST Bet is Michaels or Joann….BE SURE to use their great coupons!!!!
Michael’s and Joann’s craft stores sell it.
I’ve also purchased at Walmart