
One of Patti Paige’s many awe-inspiring creations. Photo: Instagram/Baked Ideas. Patti Paige headshot photo: Jennifer Causey
 If there’s one person who’s the source of our creative baking inspiration right now, it’s Patti Paige, an artist, baker and owner of Baked Ideas, a custom bakery in New York City. At her studio in SoHo, she creates a prolific number of baked stunners each week on Instagram, from gingerbread men in yoga poses to Hollywood’s best red carpet looks. Patti, a lifelong cookie lover and classically trained painter who’s become known for her creative use of cookie cutters in her book, You Can’t Judge a Cookie by Its Cutter, has become of favorite of everyone from Ina Garten to the White House and Oprah.
We picked Patti’s brain to find out how she got into cookie decorating, where she finds inspiration and her favorite creation that she’s ever made. See her suggestions for the best beginner and advanced cookie decorating ideas this holiday season, plus get 10 pro cookie decorating tips she can’t live without.
How did you first get into cookie decorating, and how has your style evolved over time?
Patti Paige: I began my business with a cookie that my grandmother used to make and I sold them to stores in New York City. I added chocolate chip and peanut butter cookies to the mix, but I soon felt the need to get more creative and began making gingerbread houses one holiday season. I guess the gingerbread reminded people of cookies, and I started getting requests for special custom shapes. When I couldn’t find the cookie cutters I needed (back in the day), I figured out how to make my own and the cookie decorating possibilities were suddenly endless!
When I look back at my first year of cookie decorating I can’t believe how crude the cookies look. There were no videos or tutorials to learn from, so I invented my own methods and process. My cookies are more graphic now and I think a little more sophisticated, though I hope they are still funny and whimsical. It’s also so much easier to find imagery references now. I used to go to the picture files at the New York City Public Library to look at photos and get ideas!
What’s your favorite cookie that you’ve made?
PP: I recently made cookies of vegetable slices, including onions, radishes, carrots, beets and tomatoes. I used real sliced vegetables as models and it was interesting to really pay attention to the patterns, lines and colors in the slices and try to use icing and the shape of the cookie to capture the essence of the vegetables.
Let’s say you’re a beginner and you’ve never decorated holiday cookies before. What foolproof cookie shape would you suggest, and how would you decorate it?
PP: I might try decorating a tree. The shape is already very distinctive, it can be made to look Christmas-y or just wintery, and you can decorate it any way you like. I would first ice it classic green or alternately, white (my favorite this year) or pink. After that the decoration is pretty much open ended. I like to do simple lines draped across the tree with little dots of icing along them for colored lights. Just colored dots everywhere are even easier. But any decoration will do because the shape says it all.
How about the opposite scenario – you’re a cookie pro and want a real challenge for the cookie exchange this year. What would you make, how would you ice it and why?
PP: If you are comfortable with using royal icing for more intricate and controlled decorating I have been having fun doing a twist on “ugly” christmas sweaters by putting them on dogs. To get it right you would want to first ice the dog cookie and let that dry. Then with an icing tip, outline where the sweater would be. An easy way to do this is to look at a picture online if you can’t imagine how it would look. Flood the sweater with the icing color of your choice, let that harden, and then have fun decorating the sweater. Go crazy, because the more stuff you add, the better the ugly sweater! Or sometimes I just add snowflakes or dots for something more restrained.
What’s one thing people don’t know about decorating cookies?
PP: People don’t know that the consistency of the icing is the biggest factor for success when decorating cookies. You need one consistency (looser, like thick maple syrup or honey) for flooding the cookie and another consistency (tighter. like toothpaste) for piping the lines of icing, and many consistencies in between. It can be frustrating, but once you get it right it makes all the difference in the end result.
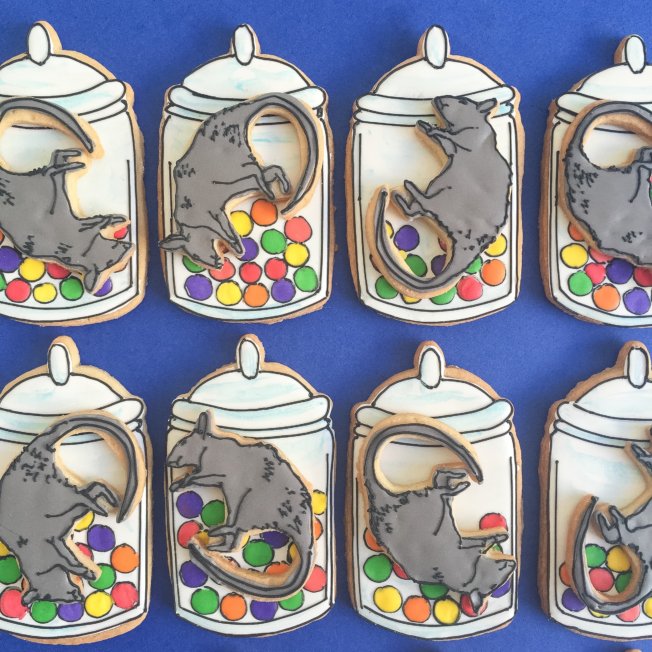
Photo courtesy of Patti Paige
What’s the most unexpected cookie you’ve ever made?
PP: The most unexpected cookie I made recently was a dead rat cookie for a celebration of the author Roald Dahl. It was supposed to be a mouse from one of his books, but everyone thinks it’s a rat, and although it is not super realistically rendered, it perfectly captures the creepiness of a dead rat and I am kind of obsessed with it.
How has your business changed since the arrival of social media outlets like Instagram?
PP: Instagram in particular has changed my business so much. Early on, I would get ideas all the time for cookies or groups of cookies i wanted to make. It was frustrating because there was no way to share them, so I usually just kept a list of the ideas and rarely bothered to turn them into cookies unless it was something for a client. With Instagram, I can have an idea, make the cookies, style and photograph them, and display them on the huge stage that is instagram. Instagram is a natural for me because I am all about the pictures and the storytelling and I love getting the responses and reactions from so many people. Plus, all the opportunities to collaborate with other brands is amazing, and I absolutely love doing that.
10 Cookie Decorating Tips from Cookie Queen Patti Paige
-
- Keep your workspace clean. One thing Patti does to keep her studio tidier is to use parchment paper icing bags. “I love the way they feel in my hand, I like that they are biodegradable, and I can just use them and throw them away. There is no cleanup except for the metal tips.” She soaks the metal tips in hot water to make them easier to clean, keeping a narrow paintbrush tidy when she washes them to make old icing easier to remove. Then she leaves them on a dish towel to dry.
- Keep the icing flowing. To avoid hardened icing, Patti has a few tricks up her sleeve. The first is to keep glass head pins handy at all times: “If any of the icing bags sit for a while and the tip gets clogged with hardened icing, I just take a straight pin with a ball on the end and poke it gently into the opening of the tip to get the icing flowing.” The second is to keep the icing covered so it doesn’t dry out. “If I am taking a long break I might lay a dry towel or an inverted bowl over the group of icing bags,” she tell us.
- Err on the lighter side when coloring icing. “Coloring icing can be very tricky!” Patti says. Even though she’s been decorating cookies forever, even she admits she’s surprised by how some colors darken as they dry. “One thing I have learned is to err on the side of too light, especially with certain colors,” she explains. “Reds and pinks are two big culprits, but most colors, with the exception of lemon yellow and black, will get darker. Another good tip is to add white food coloring to lighten a color to be sure it will not dry darker than you expect.”
- Flood your cookies with a paintbrush. To avoid unattractive air pockets, Patti uses a paintbrush to flood icing. “The process of spreading the icing onto the cookie with the side of the brush actually smooths out air bubbles while you ice.”
- Don’t shortcut the sifting process. “I found out the hard way that it is important to sift your confectioner’s sugar before you make the royal icing,” Patti admits, adding, “Even the tiniest lump of sugar that does not get dissolved will inevitably end up clogging your pastry tube tip at some point. I almost never have that problem now that I sift.”
- Take cover. “When working with royal icing, it is crucial to keep it from being exposed to air for more than a few minutes. If you do, the surface of the icing in the bowl can start to crust over and you will get what I call ‘crunchies’ in the icing. To prevent this, always keep your bowl of icing covered with a very damp towel. I prefer terrycloth because it holds the water longer, but you can also use a dishtowel if you make sure it is not drying out. Sometimes I keep a cookie tray or stainless-steel bowl on top of the towel to further keep the moisture in.”
- …Or in a pinch, spray it with water. Forgot to cover your icing, despite our caution above? Fear not! There are a few tips that may help. “Lightly spray the crusty surface of the icing with water and cover with a damp towel,” Patti says. “This will usually get the icing back to a good consistency for covering the cookie, but I may or may not trust it for piping again.” In addition, to prevent the icing from crusting over, she keeps a spoon in her bowl and gives it a quick stir between every few cookies. “If I take a longer break, I just throw a damp towel over the group of bowls of icing until I am ready to start again. I give them a stir, and I’m good to go.”
- Paint the icing on to speed up the drying process. To get her cookies to dry faster, “I apply as thin a layer of icing as possible, which I can do because I ‘paint’ the icing on,” Patti says, adding, “If the studio is particularly humid I will definitely keep the air conditioner on constantly. Lately I put trays of cookies in front of several fans to speed up drying time.”
- Add more egg white to keep your royal icing. For the glossiest iced cookie look, Patti amps up the egg white ratio: “I make my royal icing by beating confectioners sugar and pasteurized egg whites; to thin it out to various consistencies, I add more egg white. I find that using egg white makes the icing dry harder and glossier than either thinning it out with water or making the icing with meringue powder and water.”
- If you’re mailing cookies, allow more time for packing than you think you will need. “Packing is a huge job that takes way longer than you think it will!” Patti shares. She would know, having sent cookies all over the United States, Canada and abroad. “The trick is not to pack too loose or too tight. The cookies are either packaged in individual cellophane bags and tied with ribbon, or slipped into flat cello bags for protection and freshness. Then each cookie is wrapped in bubble wrap. In the bottom of a corrugated cardboard shipping box, I place loosely crumpled newsprint and then place the wrapped cookies, side by side, on their ends into the box. I layer them with crumpled paper between the layers until all the cookies are packed, then put in more crumpled paper between the cookies and the walls of the box.” When the box is closed, she pulls a final pro move, shaking it to hear or feel for any movement. “If I feel anything, I go back in and firm things up,” she explains, adding, “If you are sending a few (a dozen or so) cookies in a gift or bakery box use the same principle and insert the gift box into a shipping box with stuffing to keep the gift box from moving.”
Check out a creation Patti made exclusively for us below.
2 comments
thanks
please help me the thing I asked for in my comment